A fast paced whirlwind ride through the exciting times of bring still pictures to life... or being God if you prefer...
See how Disney did it, create a flickbook and then move very quickly on to the fundamentals of frame animation, learning Adobe Illustrator, Photoshop and Premiere (editing), along the way.
Mickey Mouse example of cell animation.
https://www.youtube.com/watch?v=jw8h9kiFF00
Drawing skills homework
2. Illustrator, lines, fill, curves, shapes, shadow, arranging objects. Duplicating and setting up assets
Example of the old-school... multi-plane camera (aka layers in Photoshop!)
https://www.youtube.com/watch?v=YdHTlUGN1z
w
3. Photoshop, cutting, painting and selection tools4. Photoshop layering and breaking the assets down. Getting them ready.
5. Photoshop animation basics
6. Loop and play animation.
 7. Backgrounds and basics of editing in Premiere
8. Play, revise Illustrator file, revise background, create a final piece that you're happy with.
Premiere
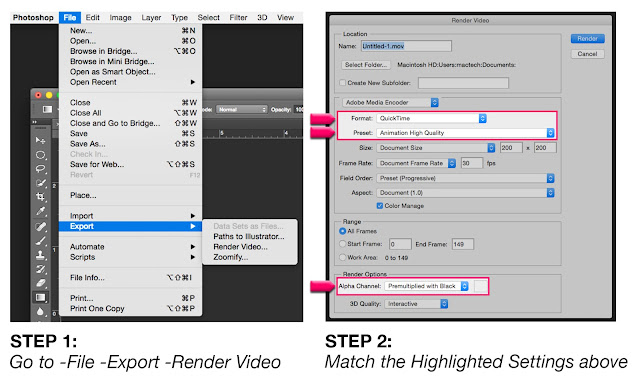
Once you have your animation exported from Photoshop you need to import your footage, and your background, to Premiere.
A clip to have some fun with.
Cut it up, rearrange, how can you tell a different story through editing?
https://www.dropbox.com/s/vrk9kv3u7h12adb/breakfastclub.mp4?dl=0
File import - imports to Premiere
PSD file means you can import separate layers from Photoshop
jpg is a smaller image that is flat (not layers)
Put your animation on a separate layer
Put your background on a separate layer
Zoom in (Z), zoom out (hold down alt and choose magnifying glass)
Do you need to duplicate your clip? Copy, paste.
Do you need to slow down your clip? Select it, and go to Clip, speed duration, and change it to 10% or 20% or whatever you need.
Click on the clip in the timeline, then go to Effect Controls.
You can resize it using scale.
You can animate it by moving left or right by selecting the clip, clicking the stopwatch icon next to Position in Effect Controls, move the playhead in the timeline (the red line with yellow triangle at the top), and change the numbers next to Position